
201303017_김인우_빅데이터기술 중간발표자료
목차
1. 데이터셋 설명
2. 데이터 분석
3. 분석 진행도
4. 앞으로 해야 할 작업
데이터셋 설명

è 데이터셋의 head(10)까지만 보면 위와같다. 칼럼들은 다음과 같다.
è Game_name(게임이름) game_positive(게임의 긍정적인 평가 점수) game_negative(게임의 부정적인 평가 점수) game_owners(게임 소유한 사람 수) game_price(게임 현재 가격) game_initialprice(게임 초기 가격) game_discount(게임 할인 가격) game_languages(게임이 지원하는 언어) game_tags(게임 태그들)
위 데이터셋은 Steamspiapi를 이용해서 python으로 데이터를 모았으며, Steamspyapi에서 제공하는 칼럼중 쓸만하다고 생각되는 칼럼들만 최대한 추출한 것이다.
위 데이터를 기반으로 game_price와 game_name을 예측하기로 하였다.
많은 예측 중 왜 게임가격인가?
가격은 사용자들에게 민감한 정보 중 하나이다. 그만큼 흥미로운 주제이기도 했다.
가격 예측에 성공을 한다면 가격예측에 영향을 미치는 특성들도 궁금했다.
많은 예측 중 왜 게임이름인가?
게임이름을 예측해야 겠다고 생각한 것은 졸업작품으로 게임추천사이트를 구축하고 있었는데
기존에 구축해 놓은 사이트는 사용자의 질문을 입력 받아서, 단순히 태그를 분류한 다음 상위 몇개의 게임을 추천해 주는 것이였다.
게임이름을 예측해 줄 수 있다면, 이 단순한 혹은 머신러닝처럼 보이는 작업으로 추천을 해주는것이 아니라 나름 정확한 데이터 정제와 알고리즘을 통해서 게임추천을 해 줄 수 있겠다 라고 생각했기 때문이다.
데이터 분석
이제 본격적으로 코드를 통해서 지금까지 진행했던 부분을 확인해 보겠다.
다음 과정은 game_price를 예측한다는 가정하에 데이터 분석을 해보았습니다.
아직 one-hot-encoding을 완벽하게 해결하지 못했기 때문입니다.
먼저, 내가 가지고 있는 데이터셋의 데이터 구조를 확인해야 했다.
import numpy as np
import pandas as pd
from sklearn.model_selection import train_test_split
import seaborn as sb
import matplotlib.pyplot as plt
기본적인 데이터 구조를 확인하기 위해서 위와 같은 library를 import 해준다.
pd.set_option('display.max_columns', None)
#
DATA_PATH ="C:/Users/user/Desktop/Data/Data.xlsx"
Y_NAME ="game_price"
#
full_dataframe = pd.read_excel(DATA_PATH, sep=',',dtype={'game_owners':int})
#
print(type(full_dataframe))
print("\n* Data Shape : ", full_dataframe.shape)
print("\n* class : ", set(full_dataframe["game_price"].values))
그런 다음 위 코드를 통해서 엑셀파일을 불러와서 데이터의 행과 열을 확인했다.
그리고 내가 예측하고자 하는 game_price의 값들을 class로써 나타내 보았다.
결과값
Data Shape : (29304, 6)
class : {0, 519, 524, 3599, 1039, 529, 1049, ….(중략생략)….1529, 509}
그런 다음 데이터의 구조를 파악해야 했다.
그러기 위해서는 데이터의 null or 공백 or 오탈자를 수정해야 했다.
모든 작업을 노트북으로 작업을 했기 때문에 코드로 돌리는 것이 번거로웠다.
그래서 null or 공백 or 오탈자수정은 엑셀에서 작업을 마쳤다.
그런뒤에 다음 코드를 통해서 null 값을 확인해 보았다.
# # 결측치 확인
print("결측치 확인")
print(full_dataframe[full_dataframe.isnull().any(1)])
결과값
결측치 확인
Empty DataFrame
위 과정이 끝났다고 생각을 하여서 내가 예측하고자 하는 game_price의 class들의 비중을 확인해 보았다.
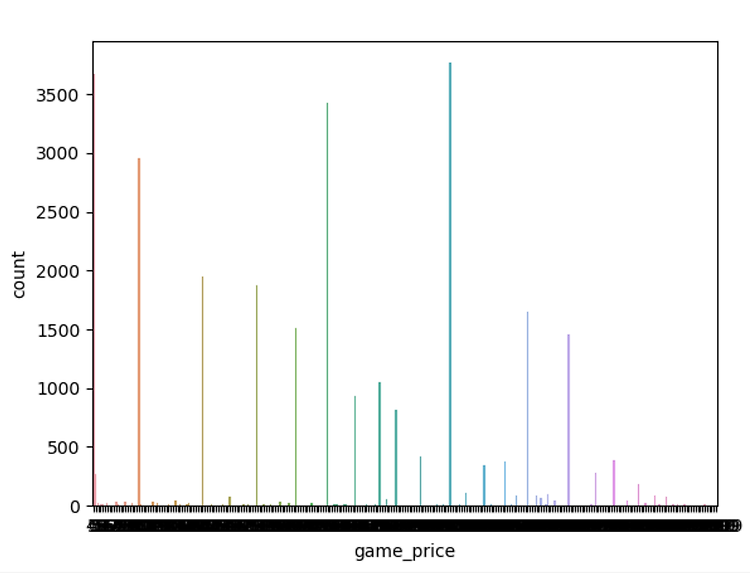
# # Data balance 확인 ( price의 비중을 시각화해서 확인해 보인다 )
sb.countplot(x=Y_NAME, data=full_dataframe)
plt.show()
결과값

시각화를 하였는데 정확한 수치를 알 수 없었기 때문에 수치로 알아보고자 다음 코드로 확인해 보았다.
# # Data balance 확인2 ( 카운트별로 갯수와 비중확인 )
labels_count = dict(game_price=0)
labels_count2 = {}
#
count = []
total = 0
print(labels_count)
print(*np.unique(full_dataframe[Y_NAME], return_counts=True))
for label in full_dataframe[Y_NAME].values:
if label in labels_count2:
labels_count2[label] +=1
else:
labels_count2[label] =1
for count in labels_count2.values():
total += count
print(total)
for label in labels_count2.items():
print("{0: <15} 개수:{1}개\t데이터비중:{2:.3f}".format(*label, label[1]/total))
del labels_count2
위 코드는 game_price의 각 값에 따른 데이터비중을 수치화로 나타내 본 것이다.
결과값은 다음과 같았다.
0 개수:3678개 데이터비중:0.126
2999 개수:383개 데이터비중:0.013
999 개수:3767개 데이터비중:0.129
499 개수:3432개 데이터비중:0.117
1999 개수:1461개 데이터비중:0.050
3959 개수:2개 데이터비중:0.000
1499 개수:1648개 데이터비중:0.056
799 개수:812개 데이터비중:0.028
3499 개수:49개 데이터비중:0.002
299 개수:1877개 데이터비중:0.064
399 개수:1514개 데이터비중:0.052
1299 개수:381개 데이터비중:0.013
2499 개수:283개 데이터비중:0.010
위 결과값을 통해서 각 game_price의 각각의 값들의 데이터비중을 알 수 있었다
데이터의 비중을 확인하였고, Resampling을 하다가 잘 해결되지 않아서 Resampling은 진행하지 않았다.
그리고 feature selection 을 통해서 내게 주어진 데이터셋중 어떤 것을 택해서 해야할지 고민을 해보았다.
Feature_selection도 종류가 다양했는데 나는 다 해보았다.
각각의 feature_selection을 확인해 본다.
Feature_selection(1)
# Feature selection with correlation and random forest classificatio (1)
f,ax = plt.subplots(figsize=(18,18))
sns.heatmap(full_dataframe.corr(), annot=True, linewidths=.5, fmt='.1f',ax=ax)
plt.show()
결과값

데이터의 비중을 눈으로 쉽게 확인할 수 있었다.
눈으로 확인이 되었으니까 수치로 보고싶었다.
다음 코드를 통해서 수치를 확인했다.
# split data train 70% and test 30%
# X_train, X_test, y_train, y_test = train_test_split(full_dataframe, full_dataframe[Y_NAME], test_size=0.3, random_state=42)
# random forest clssifier with n_estimators=10 (default)
clf_rf = RandomForestClassifier(random_state=43)
clr_rf = clf_rf.fit(X_train,y_train)
ac = accuracy_score(y_test,clf_rf.predict(X_test))
print("random forest clssifier")
print('Accuracy is: ',ac)
RandomForestClassifier를 통해서 정확도를 다음처럼 구할 수 있었다.
결과값
random forest clssifier
Accuracy is: 0.9783894449499545
높은 점수처럼 보이지만, 썩 신뢰가 가진 않는다.
그래서 다른 feature selection을 해보았다.
feature_selection(2)
# Univariate feature selection and random forest classification (2)
# find best scored 5 features
select_feature = SelectKBest(chi2, k=5).fit(X_train, y_train)
print("find best scored 5 features")
print('Score list : ', select_feature.scores_)
print('Feature list : ', X_train.columns)
# best 5 features
x_train2 = select_feature.transform(X_train)
x_test2 = select_feature.transform(X_test)
# random forest classifier with n_estimators=10 (default)
clf_rf_2 = RandomForestClassifier()
clr_rf_2 = clf_rf_2.fit(x_train2,y_train)
ac_2 = accuracy_score(y_test,clf_rf_2.predict(x_test2))
print("Accuracy is : ", ac_2)cm_2 = confusion_matrix(y_test,clf_rf_2.predict(x_test2))
sns.heatmap(cm_2,annot=True,fmt="d")
plt.show()
결과값
Score list : [4.32081632e+07 2.55317959e+07 2.51462733e+09 3.04421518e+07
3.13432396e+07 6.54490938e+05]
Feature list : Index(['game_positive', 'game_negative', 'game_owners', 'game_price',
'game_initialprice', 'game_discount'],
dtype='object')
Accuracy is : 0.9740673339399454

위 결과값을 통해서 정확도와 feature_list와 score_list를 알 수 있었다.
그렇지만 이정보로는 부족하다.
feature_selection(3)
# Recursive feature elimination (RFE) with random forest ( 3 )
# Create the RFE object and rank each pixel
clf_rf_3 = RandomForestClassifier()
rfe = RFE(estimator=clf_rf_3, n_features_to_select=5, step=1)
rfe = rfe.fit(X_train, y_train)
print("RFE")
print("Chosen best 5 feature by rfe : ", X_train.columns[rfe.support_])
결과값
RFE
Chosen best 5 feature by rfe : Index(['game_positive', 'game_negative', 'game_price', 'game_initialprice',
'game_discount'],
dtype='object')
è By rfe에 의해서 선별되어진 best 5를 알 수 있었다.
feature_selection(4)
# Recursive feature elimination with cross validation and random forest classification ( 4 )
# The "accuracy" scoring is proportional to the number of correct classifications
clf_rf_4 = RandomForestClassifier()
rfecv = RFECV(estimator=clf_rf_4, step=1, cv=5, scoring='accuracy')
rfecv = rfecv.fit(X_train, y_train)
#
print("Recursive feature elimination")
print('Optimal number of features :', rfecv.n_features_)
print('Best features :', X_train.columns[rfecv.support_])
결과값
Recursive feature elimination
Optimal number of features : 1
Best features : Index(['game_price'], dtype='object')
è Recursive feature elimination에 의한 결과값은 game_price 1개가 나왔다.
feature_selection(5)
# Tree based feature selection and random forest classification ( 5 )
clf_rf_5 = RandomForestClassifier()
clr_rf_5 = clf_rf_5.fit(X_train,y_train)
importances = clr_rf_5.feature_importances_
std = np.std([tree.feature_importances_ for tree in clf_rf.estimators_], axis=0)
indices = np.argsort(importances)[::-1]
# Print the feature ranking
print("Feature ranking:")
for f in range(X_train.shape[1]):
print("%d. feature %d (%f)" % (f + 1, indices[f], importances[indices[f]]))
# Plot the feature importances of the forest
print("Plot the feature importance")
plt.figure(1, figsize=(14, 13))
plt.title("Feature importances")
plt.bar(range(X_train.shape[1]), importances[indices],
color="g", yerr=std[indices], align="center")
plt.xticks(range(X_train.shape[1]), X_train.columns[indices], rotation=90)
plt.xlim([-1, X_train.shape[1]])
plt.show()
결과값
Feature ranking:
1. feature 4 (0.498833)
2. feature 3 (0.434810)
3. feature 5 (0.027699)
4. feature 0 (0.018487)
5. feature 1 (0.015815)
6. feature 2 (0.004356)
Plot the feature importance

è 개인적으로 이 feature_selection이 제일 좋았다. 그래프로 찍음으로써 데이터의 중요도를 쉽게 볼 수 있으며 , 수치로도 확인이 가능하기 때문이다.
è game_initialprice가 feature 중요도가 제일 높았다.
Feature_selection은 이렇게 5가지를 해보았으며 마지막 5번이 제일 좋았다. 눈으로 보기 제일 쉽고, 수치로도 나오기 때문이다.
이제 scaling을 해보겠다.
나는 scaling 4가지 ( Minmax,standard,Robust,Normalizer ) 를 다해보았으며 각각을 코드를 통해서 확인해 보겠다.
(1) StandardScaler Code
# (1) StandardScaler code
scaler = StandardScaler()
X_train_scale = scaler.fit_transform(X_train)
print("StandardScaler code")
print('스케일 조정 전 feature Min value : \n {}'.format(X_train.min(axis=0)))
print('스케일 조정 전 feature Max value : \n {}'.format(X_train.max(axis=0)))
print('스케일 조정 후 feature Min value : \n {}'.format(X_train_scale.min(axis=0)))
print('스케일 조정 후 feature Max value : \n {}'.format(X_train_scale.max(axis=0)))
결과값
StandardScaler code
스케일 조정 전 feature Min value :
game_positive 0
game_negative 0
game_owners 10000
game_price 0
game_initialprice 0
game_discount 0
dtype: int64
C:\Users\user\PycharmProjects\machinelearning\venv\lib\site-packages\sklearn\base.py:464: DataConversionWarning: Data with input dtype int32, int64 were all converted to float64 by StandardScaler.
return self.fit(X, **fit_params).transform(X)
스케일 조정 전 feature Max value :
game_positive 2648605
game_negative 487368
game_owners 150000000
game_price 39999
game_initialprice 39999
game_discount 90
dtype: int64
스케일 조정 후 feature Min value :
[-0.04886008 -0.04601326 -0.08081543 -0.71240348 -0.70940402 -0.25357541]
스케일 조정 후 feature Max value :
[124.88592683 100.37860636 116.56060055 37.1192881 34.72217609
5.79918511]
à 위를 통해 스케일 조정 후 값의 변화가 생긴 것을 확인 할 수 있다.
(2) Robustscaler code
# RobustScaler code
scaler = RobustScaler()
X_train_scale2 = scaler.fit_transform(X_train)
print("RobustScaler code")
print('스케일 조정 전 feature Min value : \n {}'.format(X_train.min(axis=0)))
print('스케일 조정 전 feature Max value : \n {}'.format(X_train.max(axis=0)))
print('스케일 조정 후 feature Min value : \n {}'.format(X_train_scale2.min(axis=0)))
print('스케일 조정 후 feature Max value : \n {}'.format(X_train_scale2.max(axis=0)))
결과값
스케일 조정 전 feature Min value :
game_positive 0
game_negative 0
game_owners 10000
game_price 0
game_initialprice 0
game_discount 0
dtype: int64
스케일 조정 전 feature Max value :
game_positive 2648605
game_negative 487368
game_owners 150000000
game_price 39999
game_initialprice 39999
game_discount 90
dtype: int64
스케일 조정 후 feature Min value :
[-0.2 -0.21052632 0. -0.62375 -0.62375 0. ]
스케일 조정 후 feature Max value :
[23031.14782609 12825.26315789 9999.33333333 49.375
49.375 90. ]
(3) Minmaxscaler code
scaler = MinMaxScaler()
X_train_scale3 = scaler.fit_transform(X_train)
print("MinMaxScaler code")
print('스케일 조정 전 features Min value : \n {}'.format(X_train.min(axis=0)))
print('스케일 조정 전 features Max value : \n {}'.format(X_train.max(axis=0)))
print('스케일 조정 후 features Min value : \n {}'.format(X_train_scale3.min(axis=0)))
print('스케일 조정 후 features Max value : \n {}'.format(X_train_scale3.max(axis=0)))
결과값
스케일 조정 전 features Min value :
game_positive 0
game_negative 0
game_owners 10000
game_price 0
game_initialprice 0
game_discount 0
dtype: int64
스케일 조정 전 features Max value :
game_positive 2648605
game_negative 487368
game_owners 150000000
game_price 39999
game_initialprice 39999
game_discount 90
dtype: int64
스케일 조정 후 features Min value :
[0. 0. 0. 0. 0. 0.]
스케일 조정 후 features Max value :
[1. 1. 1. 1. 1. 1.]
(4) Normalizer
scaler = Normalizer()
X_train_scale4 = scaler.fit_transform(X_train)
print("Normalizer code")
print('스케일 조정 전 feature Min value : \n {}'.format(X_train.min(axis=0)))
print('스케일 조정 전 feature Max value : \n {}'.format(X_train.max(axis=0)))
print('스케일 조정 후 feature Min value : \n {}'.format(X_train_scale4.min(axis=0)))
print('스케일 조정 후 feature Max value : \n {}'.format(X_train_scale4.max(axis=0)))
결과값
스일 조정 전 feature Min value :
game_positive 0
game_negative 0
game_owners 10000
game_price 0
game_initialprice 0
game_discount 0
dtype: int64
스일 조정 전 feature Max value :
game_positive 2648605
game_negative 487368
game_owners 150000000
game_price 39999
game_initialprice 39999
game_discount 90
dtype: int64
스일 조정 후 feature Min value :
[0. 0. 0.17408188 0. 0. 0. ]
스일 조정 후 feature Max value :
[0.15103973 0.12033541 1. 0.6963101 0.93654483 0.00898835]
이렇게 각각의 scaling을 적용시켜봄으로써 전과 후의 데이터값의 변화를 살펴 보았다.
SVC모델을 적용시켜서 어떤 scaling이 정확도의 차이가 큰지 확인해 보았다.
svc = SVC()
svc.fit(X_train, y_train)
print("적용전")
print('test accuracy : %3f' %(svc.score(X_test, y_test)))
# # 적용 시킨 후 (1)
scaler_min = StandardScaler()
X_train_scale5 = scaler_min.fit_transform(X_train)
X_test_scale = scaler_min.transform(X_test)
svc.fit(X_train_scale5, y_train)
print("적용후 ")
print('Scaled test accuracy : %.3f' %(svc.score(X_test_scale,y_test)))
내가 가지고 있는 데이터셋에는 StandardScaler가 SVC 모델을 통해 적용시키기 전과 후의 값의 차이가 제일 컸으며 제일 score가 높았다. 그래서 나는 standardScaler를 사용해야 겠다라고 생각하였다.
# MinMaxScaler : 0.640 --> 0.262
# StandardScaler : 0.640 --> 0.932
# RobustScaler : 0.640 --> 0.843
# Normalizer : 0.640 --> 0.294
분석진행도
|
Data 구조 확인 |
100% |
|
Feature_selection |
100% |
|
scaling |
100% |
|
One-hot-encoding |
30% |
|
알고리즘 적용하기 |
0% |
|
추가 Feature 수집하기 |
20% |
앞으로 해야할 작업
1. One-hot-encoding을 적용시켜서 데이터셋에 존재하는 문자열들을 처리한다.
2. 문자열처리가 된다면 문자열처리가 되어진 데이터셋을 기반으로 다시 처음으로 돌아가서 데이터 전처리를 시작한다.
3. 전처리가 처리된다면 알고리즘에 적용해 본다
4. 알고리즘 적용이 끝나고 시간이 남는다면 혹은 결과가 정확하게 나오지 못한다면 feature을 더 모은다.
'학부공부 > 빅데이터기술_프로젝트' 카테고리의 다른 글
| 빅데이터기술_최종발표(game_price예측) (0) | 2019.05.25 |
|---|---|
| game_price 예측(based on linear regression algorithm) (0) | 2019.05.19 |
| 데이터 모으기(4) (0) | 2019.05.05 |
| HTTP Error 403: Forbidden (0) | 2019.05.05 |
| 데이터 모으기(3) (0) | 2019.05.01 |

#IT #먹방 #전자기기 #일상
#개발 #일상


